
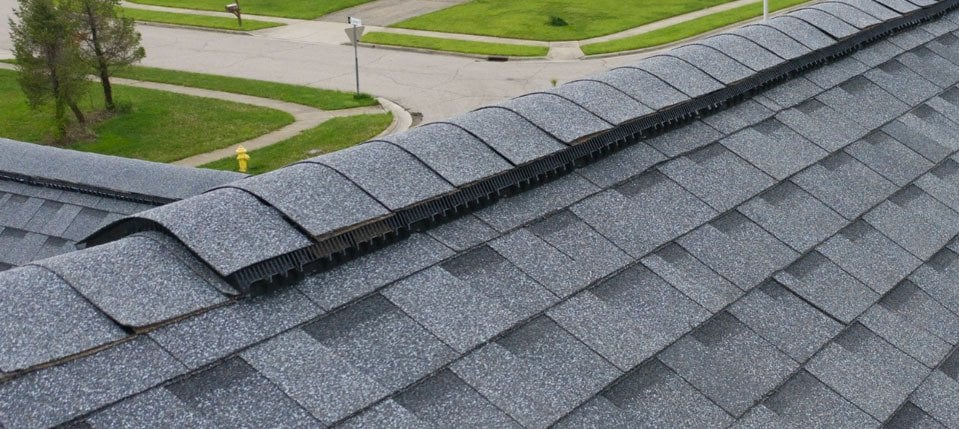
When homeowners in the Chicago metro area think about a roof replacement, the conversation often stops at shingles, flashing, and cost. Yet, the ventilation system hidden above your ceiling is just as critical to the health of your home. In this post, we walk through a recent split‑level home in Crestwood that we’re re‑roofing, and we’ll show you why ridge vent is the superior solution for attic ventilation.
Understanding the Basics: Roof Vents vs. Ridge Vents
Traditional roof ventilation relies on static vents—those small square “mushroom” or “turtle” vents you often see on older homes. They work by allowing air to escape through a fixed opening, but they have two major drawbacks:
- Limited airflow: Static vents only release air when the pressure inside the attic is high enough to push it out. In many cases, especially on homes with long ridge lines, the airflow is insufficient.
- Shape loss over time: Many static vents are made of metal that can warp, or plastic that collapses under heat, reducing their effectiveness.
Ridge vents, on the other hand, run the entire length of the roof’s peak. They provide a continuous, low‑pressure exit for warm air, allowing cooler air to be drawn in through soffit vents. The result is a steady, natural flow that keeps the attic temperature closer to the outside air temperature.
The Crestwood Split‑Level Home: A Perfect Test Bed
Our latest project is a beautiful split‑level home in Crestwood, a suburb of Chicago known for its varied architecture and seasonal weather extremes. The house originally featured the typical static vents, those square mushroom‑style openings you see on many older roofs.
Because the home has a long ridge line, it presented an ideal opportunity to upgrade to a ridge vent system. Here’s how we approached the transformation:
- Removing the old vents: We carefully covered the existing static vents with wood or metal plates, depending on the material of the surrounding roof deck. This ensured a clean, sealed surface before we cut the new vent.
- Cutting the ridge line: Following the manufacturer’s specifications, we cut a precise slot along the ridge line. This step is critical—too wide or too narrow a cut can compromise the vent’s performance.
- Installing the ridge vent: Once the shingles were in place, we installed the GAF Snow Country Rigid Ridge Vent. This is a rigid plastic vent that holds its shape under heat and wind, unlike some flexible alternatives that can sag or collapse.
- Adding the mesh layer: The vent includes a built‑in mesh screen. While moisture intrusion is rare, the mesh provides an extra line of defense, keeping debris and insects out while still allowing air to flow freely.
Why We Love Rigid Plastic Ridge Vents
There are several ridge‑vent products on the market, but the rigid plastic construction of the GAF Snow Country vent stands out for three reasons:
- Shape retention: The vent stays perfectly rectangular, even after years of exposure to sun, snow, and wind. This ensures the airflow path remains unobstructed.
- Built‑in mesh protection: The mesh adds a layer of security against the unlikely event of moisture entering the vent. It also helps keep out small debris that could otherwise clog the vent.
- Low profile design: Because the vent sits flush with the ridge, it doesn’t create a visual “bump” that can detract from the roof’s aesthetic.
Performance Benefits: What Ridge Vents Do for Your Attic
When a ridge vent is installed correctly, the attic experiences several measurable improvements:
- Reduced heat buildup: In the summer, attic temperatures can climb 150°F above the outside temperature. A ridge vent can lower that peak by 30‑40°F, reducing the load on your HVAC system.
- Moisture control: Proper ventilation helps dry out any moisture that does enter the attic, preventing mold growth and wood rot.
- Extended roof life: Excess heat accelerates shingle degradation. By keeping the roof cooler, you can add years to the lifespan of your roofing materials.
- Energy savings: A cooler attic means your air conditioner doesn’t have to work as hard, translating into lower utility bills.
When Is Ridge Vent the Right Choice?
Ridge vent works best when the home’s architecture allows for a continuous ridge line and when there are adequate soffit vents to bring cool air in. Here are the key criteria to evaluate:
- Long, uninterrupted ridge: The longer the ridge, the more effective the vent. Split‑level homes, ranches, and colonial‑style roofs often have the ideal geometry.
- Proper soffit ventilation: Ridge vent is part of a balanced system. Without sufficient intake vents at the eaves, the airflow can become stagnant.
- Roof pitch: Most ridge‑vent products are designed for pitches between 4:12 and 12:12. Extremely low‑slope roofs may need a different solution.
- Local climate considerations: In the Chicago area, where we experience hot summers and cold, snowy winters, ridge vent helps manage both heat and moisture year‑round.
Common Misconceptions About Ridge Vents
Even though ridge vent is a proven technology, homeowners sometimes have concerns. Let’s address the most frequent myths:
- “Ridge vents let rain in.” The vent’s design includes a built‑in baffle and mesh that deflects water. Proper installation ensures the vent sits flush, preventing water intrusion.
- “They’re noisy in the wind.” Rigid plastic vents are solid and don’t flap like some fabric‑based systems. You’ll hear little to no wind noise.
- “They’re expensive.” While the upfront material cost is slightly higher than static vents, the long‑term energy savings and roof longevity usually offset the initial expense.
Step‑by‑Step: How We Install a Ridge Vent on a Re‑Roof
For homeowners curious about the process, here’s a concise walkthrough of the steps we follow on a typical re‑roofing project:
- Assess the existing roof: Verify that the roof deck is sound and that soffit vents are present and functional.
- Seal the old vents: Cover each static vent with a metal or wood plate, ensuring a tight seal to prevent air leaks.
- Cut the ridge slot: Using a specialized cutting tool, we cut a slot along the ridge line that matches the vent’s width (usually 4‑6 inches).
- Lay the new shingles: Install the new shingle layers up to the ridge, leaving a small gap for the vent to sit.
- Place the ridge vent: Slide the rigid vent into the cut, ensuring it sits flush and the mesh faces outward.
- Secure the vent: Fasten the vent with the manufacturer’s recommended screws or clips, then seal the edges with roofing cement.
- Final inspection: Verify airflow by checking that warm air is exiting the vent and that there are no gaps or leaks.
Bottom Line: Ridge Vent Is the Superior Choice for Attic Ventilation
If your home’s design includes a long ridge line and you have adequate soffit intake, upgrading to a ridge vent is the most effective way to keep your attic dry, cool, and energy‑efficient. The Crestwood split‑level project demonstrates how a rigid plastic ridge vent—complete with built‑in mesh—delivers lasting performance, protects against moisture, and maintains its shape year after year.
Ready to improve your home’s ventilation? Contact Rosales Roofing today for a free assessment and discover how ridge vent can transform your attic’s health and your home’s energy bills.
Frequently Asked Questions
Q: Can I install ridge vent on a roof that already has shingles?
A: Yes. The vent is installed after the shingles are laid, so you don’t need to remove the existing roof unless you’re doing a full re‑roof.
Q: Do I need a professional to cut the ridge slot?
A: Absolutely. Precise cutting ensures the vent fits correctly and maintains the roof’s waterproof integrity.
Q: How often should I inspect my ridge vent?
A: An annual visual inspection is sufficient. Look for cracked or missing mesh and ensure the vent remains flush with the ridge.
By choosing ridge vent, you’re investing in a healthier attic, a longer‑lasting roof, and lower energy costs—all essential for homeowners in the Chicago metro area who value quality workmanship and lasting results.
